Struts2

Struts2框架搭建、OGNL表达式、配置过滤器、获取参数


Struts2简介

Struts2官网
Struts2教程
Struts2 是目前较为普及和成熟的基于MVC设计模式的web应用程序框架,其优雅、简洁、可扩展的特点使得其备受开发者的青睐,并且结合了WebWork和Struts的框架的优点,因此在一定程度上简化了WEB层的开发。
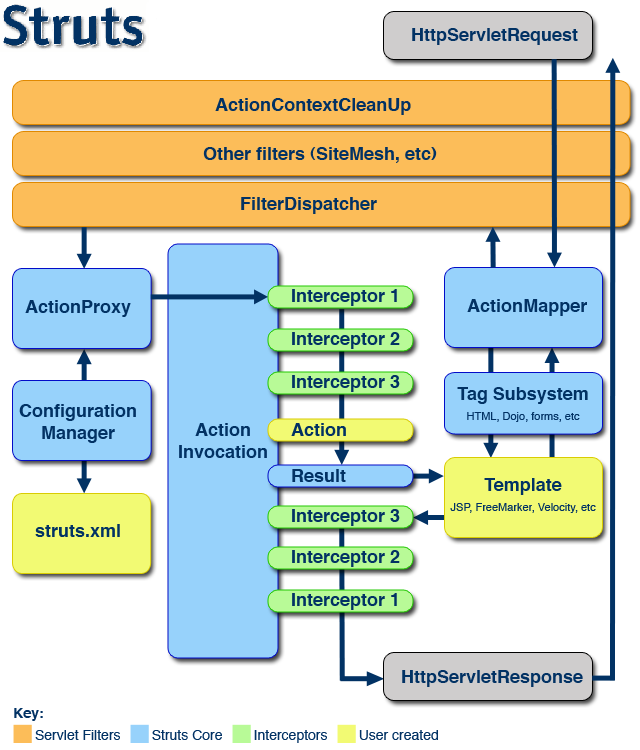
Struts2架构图

struts2


Struts2框架的搭建

在深入学习Struts2框架之前我们需要先把Struts2框架给搭起来,下面我就来演示如何搭建Struts2框架并创建一个Hello World示例。

1、下载Struts2压缩包
2、创建动态Web项目
3、导包、配置dtd文件
4、创建Action类
5、创建JSP页面
6、设置配置文件
7、配置Struts2核心过滤器
8、测试

1、下载Struts2压缩包

压缩包直接到官网下载即可,版本可以根据自己的需要选择,我下载的是struts-2.5.16-all.zip
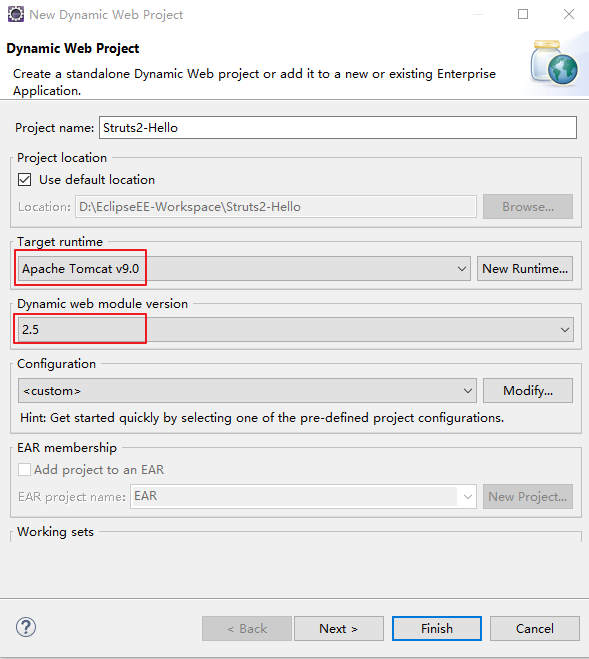
2、创建动态Web项目

在Eclipse中创建动态的Web项目,服务器我选择的是Tomcat 9:
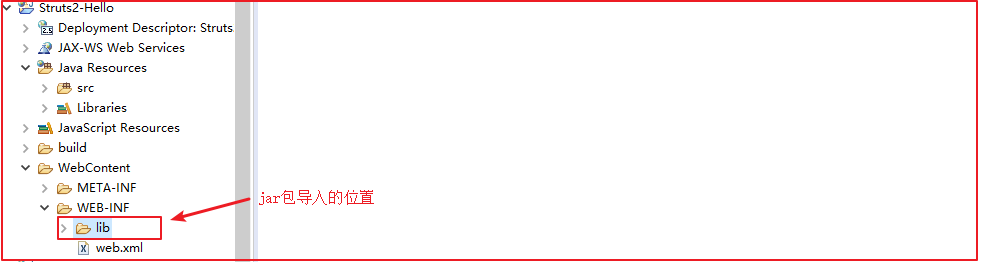
dnaymic web

3、导包、配置的dtd文件

导包可以根据自己的需要进行,Struts2提供的jar包一共有90个,这里由于仅仅是演示一个Hello World的例子,只选择一些必须用到的jar包,如果实在不知道如何选择,可以从Struts2提供的apps示例中选取jar包。
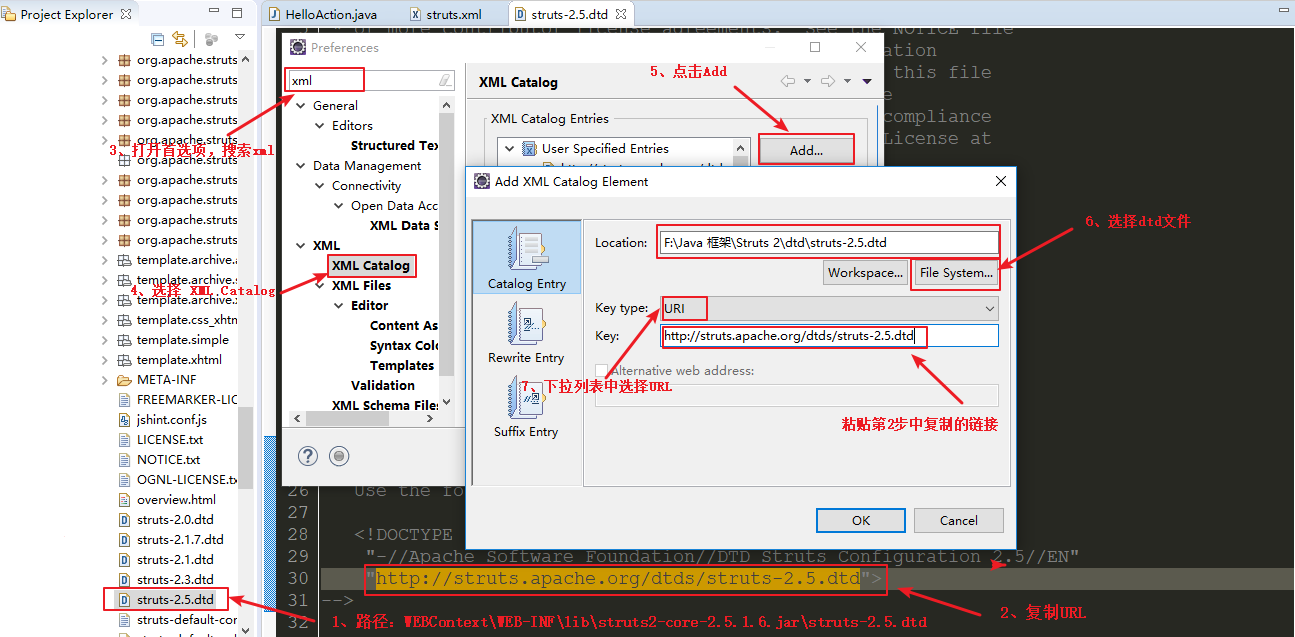
jar
jar location

设置dtd约束文件:

dtd

4、创建Action类

Action类是Struts2 应用程序的关键,类似Servlet,通常情况下,在Action类中包含了完整的业务逻辑并控制用户、模型以及视图间的交互。在Java Resources => src下创建一个HelloWorldAction,在HelloWorldAction类中继承ActionSupport类并重写execute()方法。

HelloWorldAction.java
1
2
3
4
5
6
7
8
9
10
11
12
13
14
package com.my.struts2.hello;

import com.opensymphony.xwork2.ActionSupport;

@SuppressWarnings("serial")
public class HelloAction extends ActionSupport {

@Override
public String execute() {
System.out.println("hello world !");
return "success";
}

}

5、创建JSP页面

新建一个JSP页面,在执行Action后转发到此页面:

Hello.jsp
1
2
3
4
5
6
7
8
9
10
11
12
<%@ page language="java" contentType="text/html; charset=UTF-8"
pageEncoding="UTF-8"%>
<!DOCTYPE html PUBLIC "-//W3C//DTD HTML 4.01 Transitional//EN" "http://www.w3.org/TR/html4/loose.dtd">
<html>
<head>
<meta http-equiv="Content-Type" content="text/html; charset=UTF-8">
<title>Insert title here</title>
</head>
<body>
<h1>Hello World !!!</h1>
</body>
</html>

6、设置配置文件

在项目的src路径下新建一个struts.xml文件,配置如下:

struts.xml
1
2
3
4
5
6
7
8
9
10
11
<?xml version="1.0" encoding="UTF-8"?>
<!DOCTYPE struts PUBLIC
"-//Apache Software Foundation//DTD Struts Configuration 2.3//EN"
"http://struts.apache.org/dtds/struts-2.3.dtd">
<struts>
<package name="hello" namespace="/hello" extends="struts-default">
<action name="HelloAction" class="com.my.hello.HelloAction" method="execute">
<result name="success">/hello.jsp</result>
</action>
</package>
</struts>

7、配置Struts2核心过滤器

web.xml中配置Struts2核心过滤器:

web.xml
1
2
3
4
5
6
7
8
9
10
11
12
13
14
15
16
17
18
19
20
21
22
23
<?xml version="1.0" encoding="UTF-8"?>
<web-app xmlns:xsi="http://www.w3.org/2001/XMLSchema-instance" xmlns="http://java.sun.com/xml/ns/javaee" xsi:schemaLocation="http://java.sun.com/xml/ns/javaee http://java.sun.com/xml/ns/javaee/web-app_2_5.xsd" id="WebApp_ID" version="2.5">
<display-name>Struts2-Hello</display-name>

<!-- 配置Struts2核心过滤器 -->
<filter>
<filter-name>struts2</filter-name>
<filter-class>org.apache.struts2.dispatcher.ng.filter.StrutsPrepareAndExecuteFilter</filter-class>
</filter>
<filter-mapping>
<filter-name>struts2</filter-name>
<url-pattern>/*</url-pattern>
</filter-mapping>

<welcome-file-list>
<welcome-file>index.html</welcome-file>
<welcome-file>index.htm</welcome-file>
<welcome-file>index.jsp</welcome-file>
<welcome-file>default.html</welcome-file>
<welcome-file>default.htm</welcome-file>
<welcome-file>default.jsp</welcome-file>
</welcome-file-list>
</web-app>

8、测试

将Web项目部署到Tomcat上,在浏览器中访问:http://localhost:8080/Struts2-Hello/hello/HelloAction.action,成功输出Hello World !

success


OGNL表达式

OGNLObject-Graph Navigation Language的缩写,是一种功能强大的表达式语言,使用OGNL表达式可以轻松地存取任意对象的属性、调用普通方法、访问静态属性,使用OGNL表达式所需的jar包在Struts2框架中就有,因此无需额外导包

使用OGNL存取对象的属性

1
2
3
4
5
6
7
8
9
10
11
12
13
14
15
16
17
18
19
20
21
22
23
24
25
26
27
28
29
30
31
32
33
34
35
36
37
38
39
40
41
42
43
44
45
46
47
48
49
50
51
52
53
54
55
56
57
58
59
60
61
62
63
64
65
66
67
68
69
70
71
72
73
74
75
76
77
78
79
80
81
82
83
84
85
86
87
88
89
90
91
92
93
94
95
96
97
98
99
package com.my.ognl;

import java.util.HashMap;
import java.util.Map;

import org.junit.Test;

import com.my.bean.User;

import ognl.Ognl;
import ognl.OgnlContext;
import ognl.OgnlException;

public class OgnlDemo {

/**
* OGNL基本语法,设置值、取出值、调用方法、访问静态属性
*
* @throws OgnlException
*/
@Test
public void fun1() throws OgnlException {
// 准备OGNLContext
// 1.准备Root
User rootUser = new User("Jack",18);
// 2.准备Context
Map<String, User> context = new HashMap<String, User>();
context.put("user1", new User("Jerry", 19));
context.put("user2", new User("Tom", 19));
// 将Root与context添加到OGNL中
OgnlContext oc = new OgnlContext();
oc.setRoot(rootUser);
oc.setValues(context);

// 编写OGNL语句
// Ognl.getValue("", context, oc.getRoot());
// 1.取出root中user的name
String name = (String) Ognl.getValue("name", context, oc.getRoot());
System.out.println(name);

// 2.取出context中的user1的name和age,其中#号代表从context中取值
String name1 = (String) Ognl.getValue("#user1.name", context, oc.getRoot());
Integer age1 = (Integer) Ognl.getValue("#user1.age", context, oc.getRoot());
System.out.println(name1);
System.out.println(age1);
// 3.设置属性值
String name3 = (String) Ognl.getValue("#user1.name='Alice'", context, oc.getRoot());
Integer age3 = (Integer) Ognl.getValue("#user1.age=22", context, oc.getRoot());
System.out.println(name3);
System.out.println(age3);
// 4.调用普通方法
String name4 = (String) Ognl.getValue("getName()", context, oc.getRoot());
System.out.println(name4);
String name5 = (String) Ognl.getValue("#user1.getName()", context, oc.getRoot());
System.out.println(name5);

// 5.调用静态方法,语法格式:@完整类名称@静态方法名
String message = (String) Ognl.getValue("@com.my.utils.OgnlUtils@test('Hello OGNL !')", context, oc.getRoot());
System.out.println(message);
// 5.1调用内置的Math的静态静态属性
Double pi = (Double) Ognl.getValue("@java.lang.Math@PI", context, oc.getRoot());
// 由于Math是内置的,因此可以直接使用@@静态属性
//Double pi = (Double) Ognl.getValue("@@PI", context, oc.getRoot());
System.out.println(pi);
}

/**
* 创建对象:list、Map
*
* @throws OgnlException
*/
@Test
public void fun2() throws OgnlException {
// 准备OGNLContext
// 1.准备Root
User rootUser = new User("Jack",18);
// 2.准备Context
Map<String, User> context = new HashMap<String, User>();
context.put("user1", new User("Jerry", 19));
context.put("user2", new User("Tom", 19));
// 将Root与context添加到OGNL中
OgnlContext oc = new OgnlContext();
oc.setRoot(rootUser);
oc.setValues(context);
// 编写OGNL语句
// 1.创建list对象并获取其长度
Integer size = (Integer) Ognl.getValue("#{'Alice','Bob','Jerry'}.size()", context, oc.getRoot());
System.out.println(size);
// 2.创建Map集合并获取其长度、属性值
Integer size2 = (Integer) Ognl.getValue("#{'name':'Alice','age':18}.size()", context, oc.getRoot());
// 获取属性值1
String name1 = (String) Ognl.getValue("#{'name':'Alice','age':18}['name']", context, oc.getRoot());
// 获取属性值2
Integer age1 = (Integer) Ognl.getValue("#{'name':'Alice','age':18}.get('age')", context, oc.getRoot());
System.out.println(size2);
System.out.println("name:" + name1 + " age:" + age1);

}
}

使用OGNL表达式动态设置参数

1
2
3
4
5
6
7
8
9
10
11
12
13
14
15
16
17
18
19
20
21
22
23
24
25
26
27
28
29
30
package com.my.ognl;

import com.opensymphony.xwork2.ActionSupport;

/**
* 测试在配置文件中使用OGNL表达式设置重定向参数
*
* @author mackvord
* @date 2018年8月3日
* @version 1.0
*/
public class OgnlDemoAction extends ActionSupport {

private String name;

public String getName() {
return name;
}

public void setName(String name) {
this.name = name;
}

@Override
public String execute() throws Exception {
this.name = "Alice";
return SUCCESS;
}

}
1
2
3
4
5
6
7
8
9
10
11
12
13
14
15
16
17
18
19
20
<?xml version="1.0" encoding="UTF-8"?>
<!DOCTYPE struts PUBLIC
"-//Apache Software Foundation//DTD Struts Configuration 2.3//EN"
"http://struts.apache.org/dtds/struts-2.3.dtd">
<struts>
<constant name="struts.devMode" value="true"></constant>
<package name="ognl" namespace="/" extends="struts-default">
<action name="PushStackDemoAction" class="com.my.ognl.PushStackDemoAction" method="execute">
<result name="success" type="dispatcher">/form.jsp</result>
</action>
<action name="OgnlDemoAction" class="com.my.ognl.OgnlDemoAction" method="execute">
<result name="success" type="redirectAction">
<param name="namespace">/</param>
<param name="actionName">PushStackDemoAction</param>
<!-- 使用ognl表达式动态设置参数,参数会附加在重定向的Action后面 -->
<param name="name">${name}</param>
</result>
</action>
</package>
</struts>

Struts2获取参数

首先明确一点:获取参数的方法分为两个步骤:1、获取当前Action的值栈对象;2、将用于封装参数的对象压入值栈中。但是,将参数封装(设置)到对象中的这一过程实际上是由拦截器完成的,那么问题来了,拦截器是在Action之前执行的,也就是说我们必须保证在拦截器执行之前将用于封装参数的对象压入值栈中,这样才能确保拦截器能够将前端提交过来的参数被封装到对象中,那么我们怎么在拦截器执行之前将封装参数的对象压入值栈中?,Struts2为我们提供了两种方法:

1、实现Preparable接口中的prepare()方法

通过查看Struts-default.xml可以发现,Struts2中提供了20默认的个拦截器,在这20个默认的拦截器中有一个prepare拦截器,翻译过来就是准备的意思,也就是说我们可以在这个拦截器中做一些预处理操作,查看此拦截器的源码发现,如果我们想要进行一些预处理操作可以实现Preparable接口,其源码如下(注释部分我已经删掉了):

com.opensymphony.xwork2.interceptor.PrepareInterceptor
1
2
3
4
5
6
7
8
9
10
11
12
13
14
15
16
17
18
19
20
21
22
23
24
25
26
27
28
29
30
31
32
33
34
35
36
37
38
39
40
41
42
43
44
45
46
47
48
49
50
51
52
53
54
55
56
57
58
59
60
61
62
package com.opensymphony.xwork2.interceptor;

import com.opensymphony.xwork2.ActionInvocation;
import com.opensymphony.xwork2.Preparable;
import com.opensymphony.xwork2.util.logging.Logger;
import com.opensymphony.xwork2.util.logging.LoggerFactory;

import java.lang.reflect.InvocationTargetException;

public class PrepareInterceptor extends MethodFilterInterceptor {

private static final long serialVersionUID = -5216969014510719786L;

private final static String PREPARE_PREFIX = "prepare";
private final static String ALT_PREPARE_PREFIX = "prepareDo";

private boolean alwaysInvokePrepare = true;
private boolean firstCallPrepareDo = false;

public void setAlwaysInvokePrepare(String alwaysInvokePrepare) {
this.alwaysInvokePrepare = Boolean.parseBoolean(alwaysInvokePrepare);
}

public void setFirstCallPrepareDo(String firstCallPrepareDo) {
this.firstCallPrepareDo = Boolean.parseBoolean(firstCallPrepareDo);
}

@Override
public String doIntercept(ActionInvocation invocation) throws Exception {
Object action = invocation.getAction();

if (action instanceof Preparable) {
try {
String[] prefixes;
if (firstCallPrepareDo) {
prefixes = new String[] {ALT_PREPARE_PREFIX, PREPARE_PREFIX};
} else {
prefixes = new String[] {PREPARE_PREFIX, ALT_PREPARE_PREFIX};
}
PrefixMethodInvocationUtil.invokePrefixMethod(invocation, prefixes);
}
catch (InvocationTargetException e) {

Throwable cause = e.getCause();
if (cause instanceof Exception) {
throw (Exception) cause;
} else if(cause instanceof Error) {
throw (Error) cause;
} else {
throw e;
}
}

if (alwaysInvokePrepare) {
// 调用prepare(),这就是我们要实现的方法
((Preparable) action).prepare();
}
}
return invocation.invoke();
}

}
struts-default.xml默认拦截器
1
2
3
4
5
6
7
8
9
10
11
12
13
14
15
16
17
18
19
20
21
22
23
24
25
26
<interceptor-stack name="defaultStack">
<interceptor-ref name="exception"/>
<interceptor-ref name="alias"/>
<interceptor-ref name="servletConfig"/>
<interceptor-ref name="i18n"/>
<interceptor-ref name="prepare"/>
<interceptor-ref name="chain"/>
<interceptor-ref name="scopedModelDriven"/>
<interceptor-ref name="modelDriven"/>
<interceptor-ref name="fileUpload"/>
<interceptor-ref name="checkbox"/>
<interceptor-ref name="datetime"/>
<interceptor-ref name="multiselect"/>
<interceptor-ref name="staticParams"/>
<interceptor-ref name="actionMappingParams"/>
<interceptor-ref name="params"/>
<interceptor-ref name="conversionError"/>
<interceptor-ref name="validation">
<param name="excludeMethods">input,back,cancel,browse</param>
</interceptor-ref>
<interceptor-ref name="workflow">
<param name="excludeMethods">input,back,cancel,browse</param>
</interceptor-ref>
<interceptor-ref name="debugging"/>
<interceptor-ref name="deprecation"/>
</interceptor-stack>

压栈的操作可以在prepare()方法中进行,如:

prepare()方法
1
2
3
4
5
6
7
@Override
public void prepare() throws Exception {
// 1.获取值栈
ValueStack valueStack = ActionContext.getContext().getValueStack();
// 2.将对象压入栈中
valueStack.push(user);
}

2、实现ModelDriven接口
这种方法与实现Preparable接口相比更加简单,我们可以看一下其源码,如果我们在Action中继承了ModelDriven接口,那么我们只需要重写getModel()方法,并将用于封装参数的对象返回即可,压栈的操作将由modelDriven拦截器帮我们进行,从某种程度上来说,这简化了我们的编码操作。

1
2
3
4
5
6
7
8
9
10
11
12
13
14
15
16
17
18
19
20
21
22
23
24
25
26
27
28
29
30
31
32
33
34
35
36
37
38
39
40
41
42
43
44
45
46
47
48
49
50
51
52
53
54
55
56
57
58
59
60
61
62
63
64
65
66
67
68
69
70
71
72
73
74
75
76
package com.opensymphony.xwork2.interceptor;

import com.opensymphony.xwork2.ActionInvocation;
import com.opensymphony.xwork2.ModelDriven;
import com.opensymphony.xwork2.util.CompoundRoot;
import com.opensymphony.xwork2.util.ValueStack;

public class ModelDrivenInterceptor extends AbstractInterceptor {

protected boolean refreshModelBeforeResult = false;

public void setRefreshModelBeforeResult(boolean val) {
this.refreshModelBeforeResult = val;
}

@Override
public String intercept(ActionInvocation invocation) throws Exception {
Object action = invocation.getAction();
// 判断action是否是ModelDriven接口的实例
if (action instanceof ModelDriven) {
ModelDriven modelDriven = (ModelDriven) action;
ValueStack stack = invocation.getStack();
Object model = modelDriven.getModel();
if (model != null) {
// 这是最关键的一步,帮我们进行了压栈操作
stack.push(model);
}
if (refreshModelBeforeResult) {
invocation.addPreResultListener(new RefreshModelBeforeResult(modelDriven, model));
}
}
return invocation.invoke();
}

/**
* Refreshes the model instance on the value stack, if it has changed
*/
protected static class RefreshModelBeforeResult implements PreResultListener {
private Object originalModel = null;
protected ModelDriven action;


public RefreshModelBeforeResult(ModelDriven action, Object model) {
this.originalModel = model;
this.action = action;
}

public void beforeResult(ActionInvocation invocation, String resultCode) {
ValueStack stack = invocation.getStack();
CompoundRoot root = stack.getRoot();

boolean needsRefresh = true;
Object newModel = action.getModel();

// Check to see if the new model instance is already on the stack
for (Object item : root) {
if (item.equals(newModel)) {
needsRefresh = false;
break;
}
}

// Add the new model on the stack
if (needsRefresh) {

// Clear off the old model instance
if (originalModel != null) {
root.remove(originalModel);
}
if (newModel != null) {
stack.push(newModel);
}
}
}
}
}

如果您觉得我的文章对您有帮助,请随意赞赏,您的支持将鼓励我继续创作!
0%