写在前面
经过几天时间的折腾,终于搭建好了第一个个人博客站点,整个站点基于HEXO+Github Pages搭建,使用了NexT主题。已完成部分优化,后续会继续更新!
优化配置
侧栏新建页面
以新建文档页面为例,新建分类、标签等页面与之类似,具体的操作如下:
1 | cd your site path |
1、在主题配置文件中搜索menu,新增: documents: /documents || file
2、修改~/themes/next/languages目录下的zh_Hans.yml文件,同样搜索menu,新增 documents: 文档
3、修改~/source/documents目录下的index.md文件,在文件头部添加type: "documents"和 comments: false
PDF预览
安装PDF插件,插件的地址: https://github.com/superalsrk/hexo-pdf/
1 | cd your site path |
摘要图片
简单来说就是将文章中的某一张图片作为摘要图片显示在摘要文字的后面,并且不会重复显示。文章摘要(excerpt)指的是每篇文章在首页显示的那部分内容,当然前提是我们自己设置了摘要内容。那么到底怎么做?首先要确保关闭自动摘要,也就是主题配置文件(~/themes/next/_config.yml)中的配置(默认情况下是关闭的):
1 | excerpt_description: false |
然后修改~/themes/next/layout/_macro/下的post.swig文件:
1 | {% if is_index %} |
如果需要自定义样式,可以在~/themes/next/source/css/_custom/custom.styl中的custom.styl添加下面的代码:
1 | // 去掉图片边框 |
最后,如果某一篇文章需要添加摘要图片,那么在文章的 front-matter 中添加image: url即可,url就是图片所在的路径或者链接地址。
摘要样式:
默认情况下,文章的摘要样式不太好看,字体有点大,我想将其设置得小一点,并且是斜体的,使用谷歌浏览器调试了一下,效果还不错,但是由于摘要文字被渲染完之后是使用<p>标签括住的,本来想在自定义配置文件custom.yml中,重新定义文章内的<p>标签,但是,部署到本地服务器的时候,发现文章内所有的文字效果都变了(~emmmm…),后来想了一下,既然自定义<p>标签不行,那干脆定义一个选择器.description,但是使用一对标签<p class="description">这里是摘要文字</p>将摘要括起来,然后在文章中使用<!--more-->截取文章摘要,发现有效果了。
样式:
1 | // 文章内摘要样式(主要是用来设置摘要样式) |
首页文章篇数
首先安装插件,在git中输入如下命令:
1 | npm install hexo-generator-index --save |
安装完插件,在站点配置文件中添加如下代码:
1 | index_generator: |
其中
per_page表示的是文章的篇数,index:首页、archive:归档、tag:标签
首页文章分割线
做法很简单,在~/themes/next/source/css/_custom/目录下的custom.styl文件中添加下面的代码:
1 | .posts-expand { |
设置完成后重新构建(hexo g)和部署(hexo d),刷新页面即可看到效果
打赏功能
现如今,越来越多的平台支持打赏功能,知识付费的时代正在到来,而HEXO也集成了这个功能,如果要开启这个功能,只需要修改主题配置文件,添加微信或者支付宝收款二维码图片的地址即可,例如:
1 | reward_comment: 一段文字描述! |
禁用打赏文字抖动
具体的做法就是注释掉文字抖动函数,文件路径:~/themes/next/source/css/_common/components/post/post-reward.styl
1 | ## 注释打赏文字抖动函数,将下面代码注释掉 |
页面宽度
默认情况下,next主题两边留白比较多,如果是文章中主要是文字的话,可能影响不大,但是在写技术文章的时候,可能会贴入较多的代码进行讲解,这个时候阅读代码会变得不方便。对于Pisces Scheme,需要同时修改header的宽度、.main-inner 的宽度以及.content-wrap的宽度。例如,使用百分比(Pisces 的布局定义在source\css\_schemes\Picses\_layout.styl中):
1 | header{ width: 80%; } |
上一篇,下一篇顺序
默认情况下,文章底部的文章切换按钮(<和>),其切换效果是反过来的,也就是当我们点击xxx >的时候实际上是跳转到上一篇文章而不是我们所想的下一篇文章,所以对其进行修改:
1 | {% if not is_index and (post.prev or post.next) %} |
标题栏信息调整
关于标题栏底下的信息,包括阅读时长,字数统计,评论数等,如果要修改字段的显示文字,例如将阅读时长改为热度,可以修改~/themes/next/languages/下的zh-Hans.yml文件,把相应的字段改为自己想要显示的文字即可。NexT本身集成了字数统计功能,只需要修改主题配置文件即可:
1 | post_wordcount: |
评论数的设置需要用到LeanCloud,具体的配置网上也有很多教程,这里就不贴出来了,传送门:LeanCloud,这里主要讲一下如何调整字数统计换行显示的问题,如果没有做修改,字数统计会换行显示,那么如何让其显示在一行上?很简单,只需要修改post.swig文件,文件路径:~/themes/next/layout/_macro/post.swig,+号表示添加的内容,-号表示删除的内容。
1 | {% if theme.post_wordcount.wordcount or theme.post_wordcount.min2read %} |
文章置顶
要控制文章置顶,可以通过设定一个top值来实现,具体的做法就是修改hero-generator-index插件中的generator.js文件的排序函数,文件所在路径:~/node_modules/hexo-generator-index/lib/generator.js
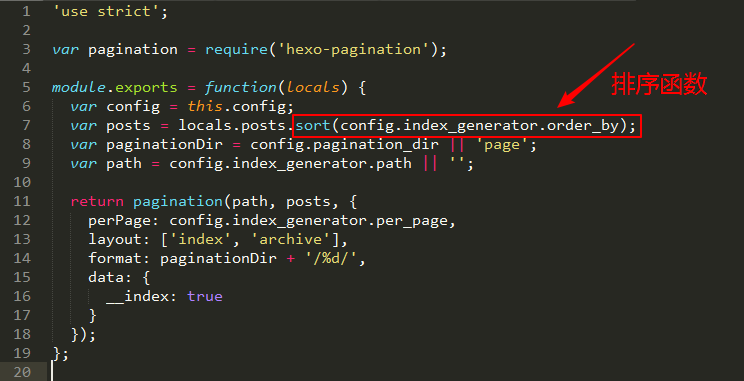
修改后的代码:
1 | 'use strict'; |
修改完成后,如果需要将文章置顶,则在文章的front-matter中添加top字段,top值越大越靠前,例如:
1 | --- |
透明度设置
修改内容模块和菜单栏的透明度
文件路径:~/themes/next/source/css/_schemes/Pisces/_layout.styl,将.header-inner和.content-wrap下的background: white以及.sidebar下的background: $body-bg-color改为background: rgba(255,255,255,0.6);其中0.6表示的是透明度,可以根据自己的需要设置(范围:0~1)。
站点概况模块透明度
文件路径:~/themes/next/source/css/_schemes/Pisces/_sidebar.styl,将.sidebar-inner下的background: white改为background: rgba(255,255,255,0.6);
导航头背景图
只需要将原来的黑色背景换成背景图即可,即:
1 | // 设置左上角站点背景 |
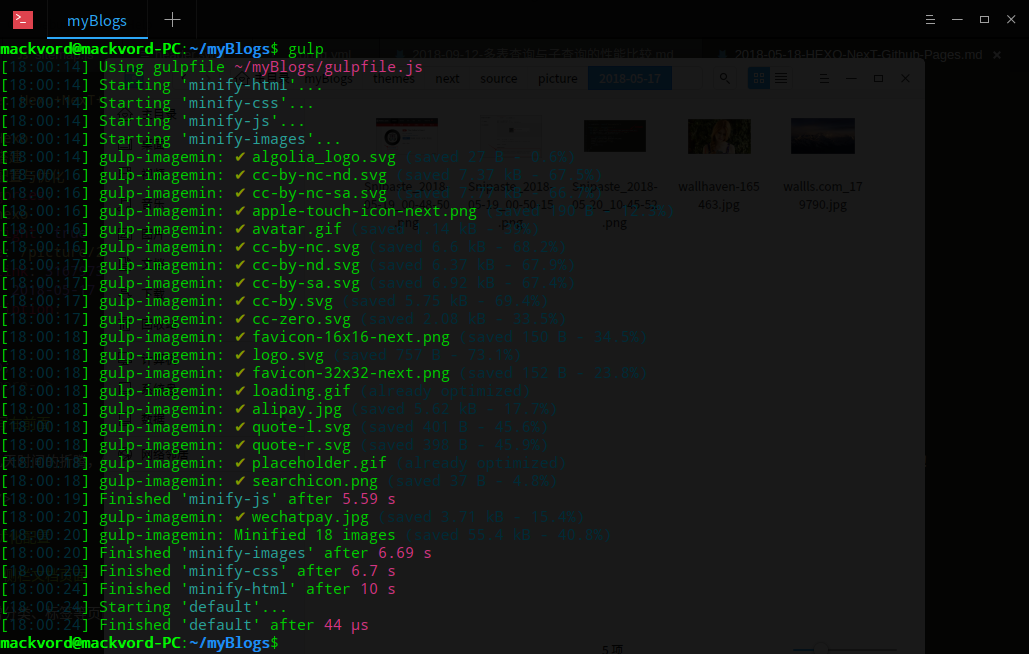
博文压缩
安装gulp插件,在命令行中使用如下命令安装:
1 | npm install -g gulp |
如果安装过程中出现了类似下面的警告信息,意思是说有些插件已经弃用了,或者改名了,又或者有更新了,跳过即可,当然,你也可以根据提示选择安装或者更新这些插件
1 | $ npm install gulp-minify-css gulp-uglify gulp-htmlclean gulp-htmlmin gulp --save |
安装完成后,可以在命令行或者shell中输入gulp -v测试一下是否有问题,如果提示没有此命令,那么可能是环境变量没有配置好,Windows系统需要在高级系统属性中配置一些环境变量,由于我用的是Linux,所以我需要在shell中建立软连接:
1 | sudo ln -s /opt/node-v8.11.4-linux-x64/bin/gulp /usr/local/bin/gulp |
除了安装gulp相关的插件外,我们还需要安装另外几个插件,主要是为了解决ES6兼容性的问题:
1 | npm install gulp-babel babel-preset-es2015 --save |
安装完成后在站点目录下新建一个.babelrc文件,注意是有一个点的,文件的内容如下:
1 | { |
完了之后在站点跟目录下新建一个gulpfile.js文件,在文件中输入一下代码:
1 | var gulp = require('gulp'); |
保存退出后便可以执行hexo clean、hexo g、gulp、hexo s命令查看效果。
文章顶部加载条
最新版的Next自带了加载条效果,只需要在主题配置文件中开启即可:
1 | # Progress bar in the top during page loading. |
点击爱心效果
创建JS文件
在~\themes\next\source\js\src目录下创建一个新的JS文件,名字自己起,例如我的是myclicklove.js,然后在JS文件中添加如下代码:
1 | !function(e,t,a){ |
修改_layout.swig文件
修改~\themes\next\layout\_layout.swig文件,在文件末尾添加一下代码即可:
1 | <script type="text/javascript" src="/js/src/这里是你的js文件名.js"></script> |
修改完成后重新渲染,部署即可看到效果。
标签云颜色
注意这里只是修改了原来标签云的颜色,如果想要其他的标签云效果,可以尝试安装插件hexo-tag-cloud
1 | {{ tagcloud({min_font: 13, max_font: 30, amount: 1000, color: true, start_color: '#ff4b1f', end_color: '#1fddff'}) }} |
关于参数,可以参考hexo官方文档
添加emoji表情
安装插件:hexo-filter-github-emojis
1 | $ npm install hexo-filter-github-emojis --save |
在站点配置文件中进行配置:
1 | githubEmojis: |
插件提供了两种渲染方式:
1 | <span class="' + options.className + '" ' + |
1 | <img class="' + options.className + '" ' + |
其中方式一是使用unicode插入emoji表情时的渲染方式,默认不开启;方式2是默认的渲染方式,即最终的表情会以图片的形式嵌入文章中,但是这样会有一个问题就是,hexo的图片弹出层插件fancybox会对emoji表情产生影响,因此,需要对插件做一些调整,首先是修改js,替换所有className为idName,实际上只有3个className,不用担心替换错,之后删除title属性。
1 | var codepoints = emojis[emojiName].codepoints |
注意上面的data-src=以及alt=前面是没有双引号的,只有单引号。上面的修改主要是去掉了表情图片下面的title,除此之外,还需要修改表情的样式,受fancybox的影响,嵌入的表情会换行居中显示,这显然不是我们想要的效果,我们要修改表情的样式,让其显示在文字的后面:
1 | // 自定义emoji样式 |
经过上面的修改,表情包已经可以在文字的后面显示了,但这还不够,因为当我们点击表情包的时候,依旧会受到fancybox的影响,像图片一样弹出,我希望的效果是即使我点击表情包,它也不会像其他图片一样弹出来,所以,我们要进一步修改,找到~/themes/next/source/js/src/utils.js,添加一行代码:
1 | wrapImageWithFancyBox: function () { |
注:代码的意思就是所有带有github-emoji类选择器的img标签都禁用fancybox效果
到这里,如果文章中的超链接设置了鼠标移进去显示下划线的话,那么这里的表情图片也会有这种效果,所以还要去掉表情包的下划线,但是有个问题就是:表情包的下划线是没了,但是站点内其他链接的样式都被影响了,没办法,为了emoji只能修改了![]()
1 | // 导航头超链接样式 |
剩下的最重要的一点就是表情包网站,要使用表情包可以到这个网站拷贝:https://www.webfx.com,使用的方法也很简单:
{% github_emoji 表情包名字 %}
# 拷贝到的表情包去掉左右的冒号即为表情包的名字
# For example:
{% github_emoji sparkles %}
更多的使用的方法可以参考GitHub
大佬的文章:https://reuixiy.github.io
另:附上另一个表情包网站:https://www.emojicopy.com
文章结束标志
在~/themes/next/layout/_macro/目录下新建一个end-tag.swig文件,添加如下代码:
1 | <div> |
其中----- Thank you <i class="fa fa-paw"></i> for reading -----这一部分可以改成你自己想要显示的内容,之后修改同级目录下的post.swig文件,在END POST BODY后面,添加如下代码:
1 | {% if not is_index %} |
注意这里代码添加的位置根据自己的需要来添加,我这里是添加到:
1 | {% if post.tags and post.tags.length and not is_index %} |
个性化配置
字体设置
编辑主题下的source\css\_variables\custom.styl文件,添加下面的代码(可根据需要修改):
1 | // 标题,修改成你期望的字体族 |
背景色块
有时候我们希望能够对某些文字进行背景色填充,用Markdown语法好像不好实现,所以干脆自己自定义颜色填充,需要用的时候直接调用即可,具体的做法:编辑themes/next/source/css/_custom下的custom.styl文件,添加属性样式:
1 | // 颜色块-黄 |
在需要进行背景色填充的文字上加上相应的标签,例如:
1 | <span id="inline-blue"> 这是蓝色填充 </span> |
这是蓝色填充
这是紫色填充
这是黄色填充
这是绿色填充
播放视频
使用插件
要播放视需要用到一个插件dplayer,将插件安装到站点文件夹的根目录下面,安装插件的命令如下:
使用 npm 安装:
1 | npm install dplayer --save 或者 npm install hexo-tag-dplayer --save |
使用 yarn 安装:
1 | yarn add dplayer |
安装完成后,将下面的代码添加到Markdown文件中,并相应的地址即可
1 | {% dplayer url"=https://******.mp4" "http://******.jpg" "api=https://api.prprpr.me/dplayer/" "id=" "loop=false" %} |
1、使用iframe标签:在Markdown文件中插入如下代码链接,链接可在视频网站获取
1 | <iframe src="//player.bilibili.com/player.html?aid=22642915&cid=37570456&page=1" scrolling="no" border="0" frameborder="no" framespacing="0" allowfullscreen="true"> </iframe> |
1 | <video src="//player.bilibili.com/player.html?aid=22642915&cid=37570456&page=1" autoplay="false" controls="controls" width="100%" height="100%"> </video> |
直接使用iframe标签插入视频,需要手工调整窗体大小,而且整体效果并不好。如果将宽度和高度设置为width="100%" height="100%",可以解决手机端显示的问题,但是在电脑端显示变得很小。
2、插入bilibili HTML5播放器
1 | <iframe src="http://www.bilibili.com/html/html5player.html?aid=22642915&cid=37570456" scrolling="no" border="0" width="740" height="440" frameborder="0" framespacing="0" allowfullscreen="true"></iframe> |
插入音乐
以网易云为例,打开网页版的网易云音乐,随便播放一首音乐,点击左侧专辑封面下面有一个生成外链播放器,复制下方的HTML代码并放到Markdown文件中即可。其中有两个个比较常用的参数可根据自己的需要进行设置:height设为0可隐藏播放器;auto设为0则表示手动播放,设为1则表示自动播放。

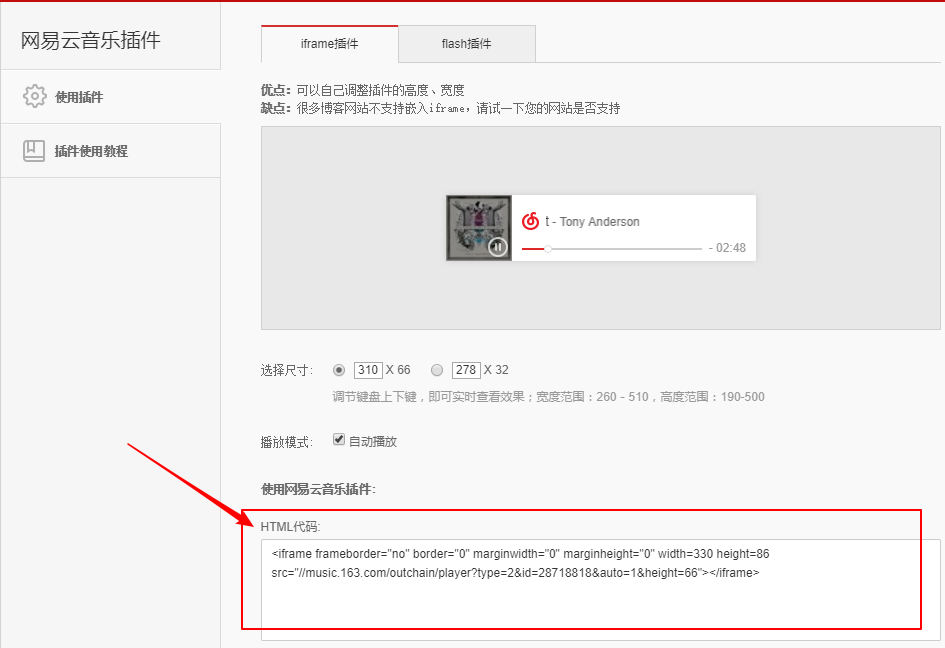
1 | <iframe frameborder="no" border="0" marginwidth="0" marginheight="0" width=330 height=86 src="//music.163.com/outchain/player?type=2&id=28718818&auto=1&height=66"></iframe> |
或者直接用HTMl标签,写法如下:
1 | <audio src="https://Xxx.mp3" style="max-height :100%; max-width: 100%; display: block; margin-left: auto; margin-right: auto;" controls="controls" loop="loop" preload="meta">Your browser does not support the audio tag.</audio> |
背景图和背景色
设置背景图片比较简单,修改~/themes/next/source/css/_custom/路径下的custom.styl文件,添加下面的代码即可:
1 | body { |
如果不想设置背景图片,但又想修改默认的主题背景色,注意是背景色,不是背景图片,那么这个时候就可通过修改~\themes\next\source\css\_variables\Pisces.styl文件来修改默认的背景色,修改的参数如下:
1 | // Settings for some of the most global styles. |
~\themes\next\source\css_variables 这个目录下保存了各个主题以及通用的基本配置参数
写作样式
很多时候我们会发现,使用Markdown写作会有一定的局限性,毕竟有时候我们会想在文章中加入一些有意思的样式来提高文章的阅读效果。
主题自带样式:note标签
这是Next自带的主题,在主题配置文件 (config.yml) 中有相关的设置。有关note的style可以在此处预览点我
1 | # Note tag (bs-callout). |
用法以及效果:
1 | <div class="note default"><p>default</p></div> |
default
1 | <div class="note primary"><p>primary</p></div> |
primary
1 | <div class="note success"><p>success</p></div> |
success
1 | <div class="note info"><p>info</p></div> |
info
1 | <div class="note warning"><p>warning</p></div> |
warning
1 | <div class="note danger"><p>danger</p></div> |
danger
1 | <div class="note danger no-icon"><p>danger no-icon</p></div> |
如果想修改默认的样式可以修改~\themes\next\source\css\_variables\base.styl文件,默认的样式如下:
1 | // Note colors |
主题自带样式:label标签
label标签与note标签类似,也是自带的,默认情况下是启用的。
1 | # Label tag. |
用法以及效果: @前面是label名称,后面是要显示的文本内容
1 | {% label default@default %} |
1 | {% label primary@primary %} |
1 | {% label success@success %} |
1 | {% label info@info %} |
1 | {% label warning@warning %} |
1 | {% label danger@danger %} |
1 | // Label colors |
主题自带样式:tabs标签
tabs标签的效果有点类似于可切换的表格:
1 | {% tabs 选项卡, 2 %} |
效果:
这是选项卡 1 上面的选项卡点击可以切换
这是选项卡 2
这是选项卡 3
主题自带样式:按钮
1 | {% btn URL, Text, icon [class], Title %} |
效果:
更多按钮的用法可以查看这位大佬的文章:https://almostover.ru/2016-01/hexo-theme-next-test/#Button-tag-test
主题自带样式:代码块高亮
1 | public class HelloWorld { |
完整的用法:
在第一个```后面添加相应的信息即可:[language] [title] [url] [link-text]
[language] 是代码语言的名称,用来设置代码块颜色高亮,非必须;
[title] 是顶部左边的说明,非必须;
[url] 是顶部右边的超链接地址,非必须;
[link text] 如它的字面意思,超链接的名称,非必须。
添加居中模块
1 | <blockquote class="blockquote-center">生活不止眼前的苟且,还有诗和远方!</blockquote> |
效果:
生活不止眼前的苟且,还有诗和远方!
插入图片与PDF文档
关于Hexo的其他配置可以参考:Hexo官方文档
插入图片:
使用Markdown插入图片的语法格式如下:

[Alt text]:图片的描述文字[path]:图片所在的路径
除了使用Markdown之外,也可以使用HTML的<img>标签:
1 | <img src="image_path" tltle="titleName" alt="altName" width="width"> |
[image path]:图片的路径[Alt text]:显示的文本[width]:图片的宽度
效果图片:
插入PDF文档:
将相应的PDF文档放在与博客标题同名的文件夹内,然后再按照如下方式进行插入:
[PDF File](FileName.pdf)
添加注脚
1 | npm install hexo-reference --save |
用法:
1、加注:this is a basic footnote[^text] ##text是显示的文本,例如1.
2、在文章的任意位置添加注脚的内容,如:[^text]:这里写注脚要显示的内容.
效果:
这是一个注脚[1],在解析md文章的时候,会在文章的最后生成一个注脚。
自定义Note标签
1 | .alert { |
1 | <div class="alert alert-success"><i class="fa fa-lightbulb-o"></i> BUG虐我千百遍,我待BUG如初恋 </div> |
1 | <div class="alert alert-info"><i class="fa fa-info"></i> BUG虐我千百遍,我待BUG如初恋 </div> |
1 | <div class="alert alert-warning"><i class="fa fa-bell"></i> BUG虐我千百遍,我待BUG如初恋 </div> |
1 | <div class="alert alert-danger"><i class="fa fa-bug"></i> BUG虐我千百遍,我待BUG如初恋 </div> |
TOC数字块
1 | .section-number-2 { |
效果:
1.<span class="section-number-2"></span>
常用命令
1 | // 清除缓存 |
下面是我的依赖包信息,主要是一些已安装的插件信息:
1 | { |
Seo优化
中文链接问题
默认情况下,hexo使用文章创建的时间和文章的标题作为访问URL的一部分,但这样有一个问题就是,如果你的文章标题使用了中文,那么,访问的URL地址中就会出现中文,所以如果你是处女座或者有强迫症,这种问题是绝对不能忍受的,当然,从另一方面来看,这也不利于搜索优化,所以我们要对其进行改进,这里采用的方法是使用hexo-abbrlink插件,用法相当简单,先安装插件:
1 | npm install hexo-abbrlink --save |
修改站点配置文件,搜索permalink,修改为:
1 | permalink: :abbrlink.html # 生成唯一链接 |
自动推送
博客搭建完之后,如果我们希望搜索引擎能够快速地收录我们的博客,那么我们就可以利用百度或者Google的站长工具主动推送自己的博客,因为我自己并没有提交到Google,所以,这里以百度为例,提交到百度可以从两个方面来进行,第一个是登录百度站长平台主动提交站点信息,这一部分基本都是图形化操作,这里就不说了;另一个就是使用Next自带的SEO优化功能,这一部分的设置可以在主题配置文件中开启:
1 | baidu_push: true |
接下在~/themes/next/source/js/src下新建一个js文件:sitemap.js,内容为:
1 | // SEO自动推送 |
完了之后,需要在页面中引入sitemap.js,我这里是在~/themes/next/layout/_custom目录下的header.swig文件中引入:
1 | <script src="/js/src/sitemap.js"></script> |
站点地图
要使用站点地图,需要安装插件:
1 | npm install hexo-generator-sitemap --save |
接下来修改站点配置文件
1 | # 网站地图 |
站点地图在执行hexo g命令完整渲染后生成的sitemap.xml和baidusitemap.xml会放置到public文件夹下
结束语
由于非JS出身,在博客的搭建与优化的过程中,碰到了不少问题,也走了不少弯路,但是由衷感谢各位大神的文章,让自己学到了不少东西,下面是本人参考过的部分文章以及文档。
配置参考:
https://qianling.pw
https://www.ofind.cn/
https://reuixiy.github.io
https://www.vincentqin.tech
http://theme-next.iissnan.com/
https://hexo.io/zh-cn/docs/writing.html
https://zhuanlan.zhihu.com/p/30836436
- 1.这是一个用于测试的注脚 ↩